In this tutorial we are going to be making some assumptions that you can tune if you need to. In my case we are going to start with a clean install of CentOS 6.2 with the minimal package option. The server will have (2) NICs one public facing the other is private facing.
Here is a diagram of what that could look like.
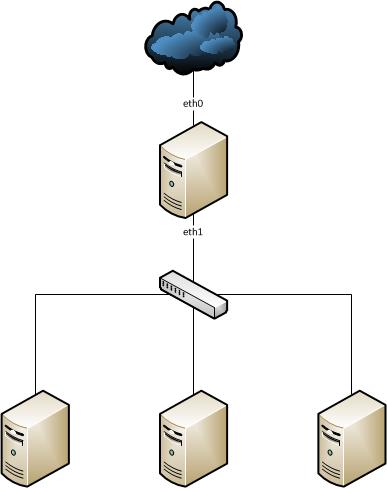
What we want at the end of the day is for clients on the eth1 network to call out to the DHCP server, PXE boot and get a menu for install options. I'll also cover at the end how you can spruce this up with a kick start file to automate the process.
We are going to create a centos image that we are going to pxe boot, but you can append what ever distro you want as well.
OK let's get started, first lets grab all of the packages we are going to use:
yum install dhcp httpd tftp-server syslinux xinetdLet's do the smart thing and make sure that all loads at boot
chkconfig httpd on
chkconfig dhcpd on
chkconfig xinetd on
Disable SeLinux which will cause issues with Apache
setenforce 0

vi /etc/selinux/config
....
SELINUX=disabled
DHCP server config
Lets start by configuring the DHCP server first.
Start by using vi or your favorite editor on the following file: /etc/dhcpd/dhcpd.conf
subnet 192.168.21.0 netmask 255.255.255.0 {
allow booting;
allow bootp;
option subnet-mask  255.255.255.0;

next-server 192.168.21.1;
ddns-update-style none;

option domain-name-servers 8.8.8.8, 192.168.21.1;
option routers 192.168.21.1;
option broadcast-address 192.168.21.255;
default-lease-time 3600;
one-lease-per-client true;
range 192.168.21.10 192.168.21.190;
filename "pxelinux.0";
}
Read this! The above assumes that eth1 is 192.168.21.1, so replace that value with what ever value is either assigned to your NIC or that you want assigned to your NIC.
next-server is used to tell the clients where to go for the pxe-boot process. So if you wanted to stand up a DHCP server separate from your TFTP/PXE server, you would change "next-server" to the IP address of the TFPT/PXE server. In our case, we are using them on the same machine.
Notice that in domain-name-servers I used 8.8.8.8 first, that is googles DNS, so you can update those values to reflect your internal DNS servers if you like.
TFTP/PXE server config
CentOS installs the TFPT server in /var/lib/tftpboot/ so head over there. We also need to mount a CentOS 6.2 cd to grab some files off it, if you have not already mounted a CDrom with the CentOS 6 installer, you can just mount an ISO of it with the following command (assumes that you coped the ISO file to /tmp):
mount -t iso9660 -o loop /tmp/CentOS-6.2-x86_64-bin-DVD1.iso /mediaNow we need to prep that folder:
mkdir /var/lib/tftpboot/pxelinux.cfg
cp /usr/share/syslinux/pxelinux.0 /var/lib/tftpboot/
cp /usr/share/syslinux/menu.c32 /var/lib/tftpboot/
mkdir -p /var/lib/tftpboot/images/centos/x86_64/6.2/
cp /media/images/pxeboot/vmlinuz /var/lib/tftpboot/images/centos/x86_64/6.2/
cp /media/images/pxeboot/initrd.img /var/lib/tftpboot/images/centos/x86_64/6.2/
Now we need to edit the PXE file so it gives you a menu and options:
vi /var/lib/tftpboot/pxelinux.cfg/default
.......
prompt 0
timeout 300
default menu.c32
ONTIMEOUT local

menu title ------ PXE Boot options ------

LABEL CentOS 6.2 x86_64 installer
 MENU LABEL CentOS 6.2 x86_64 installer
 KERNEL images/centos/x86_64/6.2/vmlinuz
APPEND initrd=images/centos/x86_64/6.2/initrd.img method=http://192.168.21.1/centos6  ramdisk_size=100000 ip=dhcp url --url http://192.168.21.1/centos6/
Configure Apache
What we want is the clients that are going to boot to be able to call up the full installer ISO, so we are going to use apache to provide the files. In order to do that, we need to make the following updates to apache's config.
vi /etc/httpd/conf.d/00-pxeboot.conf
....

Alias /centos62 /boot-images/centos/x86_64/6.2
<Directory /boot-images/centos/x86_64/6.2 >
   Options Indexes FollowSymLinks
   Order Deny,Allow
   Deny from all
   Allow from 127.0.0.1 192.168.21.0/24
</Directory>
An important difference between debian and Centos is that Cent requires the 00 prefix in the file name, where as debian does not
So what that is doing is making an alias for Apache to use. In our case, we are putting the ISO files in /boot-images/.
If your setup is / is one partition, make sure you have enough space, otherwise, add a disc and mount it in /boot-images
mkdir -p /boot-images/centos/x86_64/6.2/
cp -Rv /media /boot-images/centos/x86_64/6.2/

chmod -R o+rx /boot-images/
The last command makes sure that apache can read those files, if you want tighter security, you can use:
chgrp -R apache
 chmod -R 750 /boot-images
Allow the network to work
In my example, we have (2) NICs, so I want clients to connect to the DHCP server and have it act as a gateway, so I need to enable some features to allow that.
Lets modify iptables:
vi /etc/sysconfig/iptables
.....

# Firewall configuration written by system-config-firewall
# Manual customization of this file is not recommended.
*filter
:INPUT ACCEPT [0:0]
:FORWARD ACCEPT [0:0]
:OUTPUT ACCEPT [0:0]

-A INPUT -m state --state ESTABLISHED,RELATED -j ACCEPT
-A INPUT -p icmp -j ACCEPT
-A INPUT -i lo -j ACCEPT

#Allow SSH only from inside the rack, or a specified outside IP
#Replace XXX with your IP range
-N SSH
-A SSH -s 192.168.21.0/24 -j RETURN
-A SSH -s xxx.xxx.xxx.xxx/24 -j RETURN
-A SSH -p ALL -j REJECT

#Prevent People not in our subnet to see the ssh port
-A INPUT -p tcp -m tcp --dport 22 -m state --state NEW,ESTABLISHED -g SSH
-A INPUT -p tcp -m tcp --dport 22 -m state --state NEW,ESTABLISHED -j ACCEPT

#Assume traffic from eth1 is clean and allow it
-A INPUT -i eth1 -j ACCEPT

#Dump the rest.
-A INPUT -j REJECT --reject-with icmp-host-prohibited

-A FORWARD -i eth0 -o eth1 -m state --state RELATED,ESTABLISHED -j ACCEPT
-A FORWARD -i eth1 -o eth0 -j ACCEPT

COMMIT

*nat
:PREROUTING ACCEPT [5556:310567]
:POSTROUTING ACCEPT [11:3060]
:OUTPUT ACCEPT [23:3801]

-A POSTROUTING -o eth0 -j MASQUERADE
COMMIT
Now enable IP forwarding
echo 1 > /proc/sys/net/ipv4/ip_forwardTest
Make sure the following value is NO
cat /etc/xinetd.d/tftp
....
<strong>disable	= no</strong>
Now start the stack up…
service httpd start
service dhcpd start
service xinetd start
Now try to boot a host in PXE, mode. You should now get the menu that you created above and be able to boot that installer image.
Next steps
So that gets you PXE booting, but now you want to take it to the next level, you want automatic installs!
No problem, you can script your machine installs with a kick-start file.
There is a ton of info out there on how to make a kickstart file, so I am not going to cover that. I am going to show you how to just jump in though with no knowledge of the kickstart file creation process.
First, make a clean install on a machine and configure the options as you want them. After the install is complete, in the root users home folder you will see a file called "anaconda-ks.cfg "
That file is a clone of the options that you made when you ran the install, go ahead and copy that file to your PXE server and place it in /var/www/html
Lets rename that file to centos62.ks and make a folder for ks
mkdir /var/www/ks/
mv /var/www/html/anaconda-ks.cfg /var/www/ks/centos62.ks
The only change that you "should" make for sure is the disk partition section unless each machine you are going to install this on will have EXACTLY the same disc and capacity drive.
If not, comment out the line that starts with "#part /boot --fstype=ext4 --size=500" and keep commenting out until you get to the last line in that section which normally is "logvol swap --name=lv_swap --vgname=vg_name --grow --size=1024 --maxsize=8016"
In order to offer the kick start option, you just need to make two changes to the above config.
Update apache
We are going to add another alias
vi /etc/httpd/conf.d/00-pxeboot.cfg
....
append the following to the file
-------

Alias /centos6-ks /var/www/ks
<Directory /centos6-ks>
   Options Indexes FollowSymLinks
   Order Deny,Allow
   Allow from all
   Allow from 127.0.0.1 192.168.21.0/24

</Directory>
Reload apache
service httpd reloadUpdate your menu options
We need to include an option now for the kick start installer version.
vi /var/lib/tftpboot/pxelinux.cfg/default
.....
Append the following lines
---------

LABEL CentOS 6.2 x86_64 installer -Kickstart
 MENU LABEL CentOS 6.2 x86_64 installer - Kickstart
 KERNEL images/centos/x86_64/6.2/vmlinuz
 APPEND ks=http://192.168.21.1/centos6-ks/centos62.ks initrd=images/centos/x86_64/6.2/initrd.img method=http://192.168.21.1/centos6  ramdisk_size=100000 ip=dhcp url --url http://192.168.21.1/centos6/
Test
Reboot a PXE node and PXE boot again, this time when you load the menu, you should see you new kickstart line. When you boot, the installer will only prompt you about the disc layout information, the rest will all be done automatically!
I hope this helped you, if so please leave a comment below and let others know what did and didn't work for you.