Below I am going to outline a basic install of squid on Debian Lenny. If you are reading this you probably have googled this already, so it's worth noting that I assume you have a vanilla Debian install and that the server has 2 NICs. 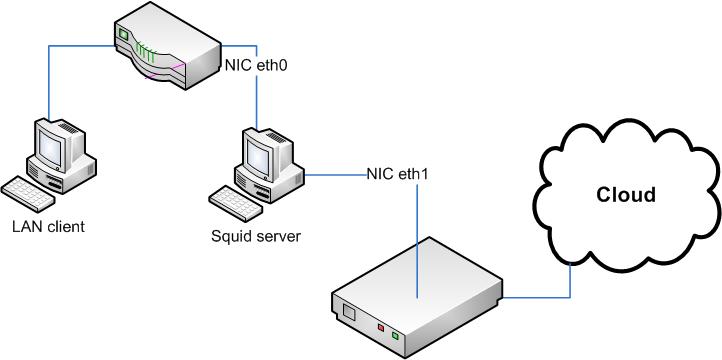
First we need to install the actual squid proxy server:
apt-get install squid3Next we need to configure the squid.conf file to get it working, by default the squid.conf file in /etc/squid3/ is commented... heavily. So we are just going to copy that and save it for future use or reference.
mv /etc/squid3/squid.conf /etc/squid3/squid.conf.original Great, now lets create a new empty copy of that file we can fill in:
touch /etc/squid3/squid.confBelow is BAREBONES config that we can start with just to get the ball rolling:
http_port xxx.xxx.xxx.xxx:3128 transparent
access_log /var/log/squid3/access.log
acl our_networks src xxx.xxx.xxx.0/24
acl localnet src 127.0.0.1/255.255.255.255
http_access allow our_networks
http_access allow localnet
If you want to have the traffic coming in from NIC 0 flow out to NIC 1 as shown in the image at the start you would also add the following to your confiq replacing the "xxx" with the ip of the 2nd NIC. If you dont do this, it will just route out on NIC 0.
tcp_outgoing_address xxx.xxx.xxx.xxxYou need to replace the first xxx above with your servers IP address that squid is going to listen on. The 2nd is for setting an ACL that only allows squid to respond to clients on a particular subnet. It's worth reading (squid's security warning) about why you want to make sure to restrict squid to authorized hosts, otherwise anyone can use your proxy and all the traffic (imagine the worst) will look like it's coming from you.
For squid3, that's it you dont need to use the old firewall trick, but I've outlined it below just in case you are looking for information prior to squid3. An exception to this is if you are running the server for transparent proxy mode (if you dont know what that is, your not doing this yet).
Squid 3 users can skip to wrap up.
Next, we need to configure the server to allow IP forwarding for our changes to the firewall. You need to edit /etc/sysctl.conf and find and un-comment the following line:
net.ipv4.ip_forward=1This will allow forwarding on your NICs, which is what we are going to setup next. Let's create a file called "firewall", we are going to input our firewall rules to allow the traffic to be routed correctly.
touch firewallIt's worth noting, this is a HORRIBLE configuration to run publicly. If all you use is my example below, your box is going to get owned. However, I just want to show you enough to get it working, then allow you to tweak it and lock it down later.
Again, replace xxx below with your servers IP address (note the line wrap below, copy and paste to view correctly).
*mangle
:PREROUTING ACCEPT [55898:6102568]
:INPUT ACCEPT [55898:6102568]
:FORWARD ACCEPT [0:0]
:OUTPUT ACCEPT [2676:348104]
:POSTROUTING ACCEPT [2676:348104]
COMMIT
*nat
:PREROUTING ACCEPT [22773:2610640]
:POSTROUTING ACCEPT [5:372]
:OUTPUT ACCEPT [5:372]
-A PREROUTING -i eth1 -p tcp -m tcp --dport 80 -j DNAT --to-destination xxx.xxx.xxx.xxx:3128
-A PREROUTING -i eth0 -p tcp -m tcp --dport 80 -j REDIRECT --to-ports 3128
-A POSTROUTING -o eth0 -j MASQUERADE
COMMIT
Now we need to load that:
/sbin/iptables-restore firewallWrap up
Last, lets start up squid:
/etc/init.d/squid3 startNow you are ready to test this, below I am going to show configuring firefox 3.6.3 but if you google setting a proxy on your particular browser you should get the same info.
Select tools > Options
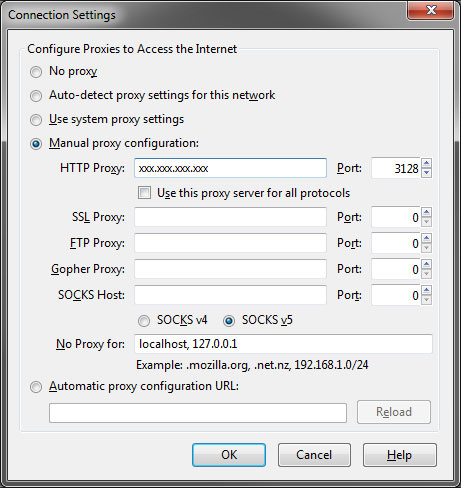
As shown below, select the advanced tab then select settings.

Then choose "manual proxy configuration" and enter the IP address you entered in your squid.conf file above (>http_port xxx.xxx.xxx.xxx:3128)
Now try to surf to a new web page. If it works your in business, if you get an error stating that the server does not listen, make sure that the squid server was started and started without errors. If the connection just times out, make sure that you have entered the correct IP address for the server in the squid.conf file and that the IP range you specified for the ACL is valid and in the same range you are on when you test.
This is a manual proxy setting, meaning if you wanted to deploy this on a network, you would have to make this change on each machine and on each browser. If you want this to happen automatically and for more than just browsers you need to configure squid to run as a transparent proxy. I'll cover this in a separate tutorial.
Still having trouble, leave me a note below and I'll see if I can help.